

How to Avoid the Scenario Modeling Mess Everyone Falls Into
 |
When people get into scenario modeling, things usually get messy.
Sometimes it’s mild: extra output sections, bloated formulas, and messy IF statements trying to simulate different cases.
Other times it’s more extreme: entire versions of the model copied into separate tabs -- or worse, multiple files being manually compared in a third workbook.
(✋and just to put my hand up, I've done this).
In every case, the core problem is the same: too much duplication, not enough structure.
After years of learning the hard way, here’s how I build fully dynamic, scenario-driven models -- without ever duplicating logic -- and make it dead simple to toggle assumptions and compare outcomes.
Step 1: Create "Scenario Blocks"
I start by building three blocks of input assumptions (usually Base, Upside, Downside) on the same sheet, all side-by-side.
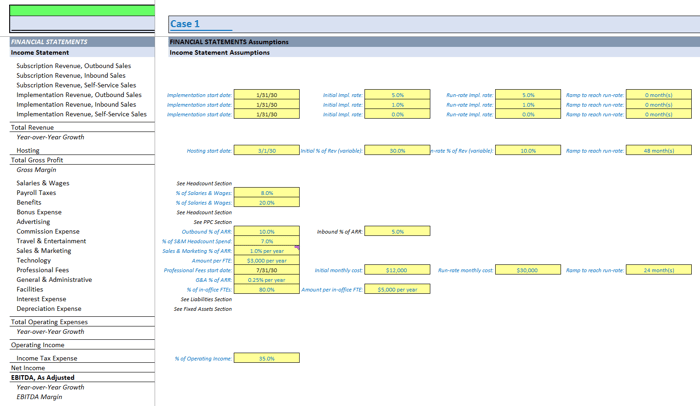 |
Each block is identical in layout -- literally copy/paste across columns.
This includes assumptions like PPC start date, new logos per month, churn rate, CAC, you name it.
 |
This alone keeps things organized.
But the real value comes from the way these inputs are linked back to the rest of the model.
Step 2: Create the “Live Section”
Next, I set up a "Live Section" that pulls inputs from one of the three scenarios using the CHOOSE function:
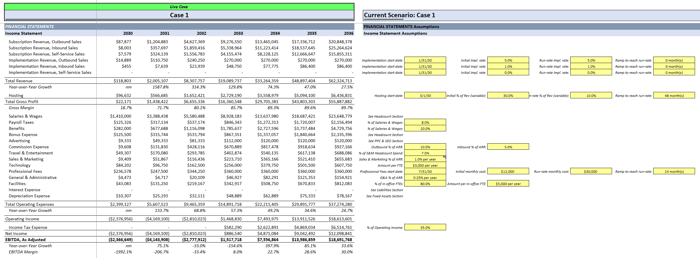 |
- "Current_Scenario" is a global input -- just enter 1, 2, or 3
- The rest of the formula pulls from each "scenario block"
- Only the Live Section contains named ranges like PPC_Start_Date or Churn_Rate, so the full monthly model (on a separate tab) references just one clean set of inputs
This keeps the logic centralized, flexible, and easy to audit.
➕ Bonus: Add Unlimited Scenarios
Need to add a 4th or 5th scenario?
Just:
- Copy the input block again (i.e., "Case 4")
- Paste it to the right
- Update the CHOOSE formula like this:
This creates a scalable and clean way to add tons of scenarios.
No changes in the underlying model logic.
💡 Pro Tip: Inputs Next to Outputs
One thing I always do: place key inputs right next to the outputs they affect most.
Honestly, I can't stand "Input Pages" because once I make a change, I have to flip through tons of other tabs to see, "hey did that actually work?"
By putting inputs next to outputs, I can see the change immediately, which is:
- Efficient
- Confirms my model is actually working correctly (and this is a great way to debug if something looks off)
So for example, if I change something like CAC or customer growth, I can instantly watch the changes ripple through total revenue, logo count, or conversion rates -- without flipping tabs.
This setup is incredibly useful in stakeholder meetings.
It lets everyone see the cause and effect in real time.
|
Step 3: Capture a “Control Case” for Comparison
Once I’ve run a scenario I like (usually a Base Case), I’ll copy/paste the Live Case into a Control Case section.
This gives me a "frozen version" of a prior run to compare against.
Then I calculate variances line-by-line across the entire model.
This is a simple way to show what changed -- without bloating your file with versioned tabs or separate comparisons.
(and for the truly daring, you can do this live in a meeting 😬)
 |
Scenario Modeling: Why It Works
- One model
- Scalable inputs
- Real-time scenario switching
- Clean variance analysis
- Easy for execs to understand
Whether you're building for SaaS, manufacturing, or services -- it all works the same.
Adjacent Scenario Blocks > Live Scenario > Feed to Model > Outputs in Real Time
Hope this gives you a few ideas you can swipe and use right away.
That's it for today. See you next time.
—Chris
p.s., if you enjoyed this post, then please consider checking out my Financial Modeling Courses. As featured by Wharton Online, Wall Street Prep, and LinkedIn Learning, you'll learn to build the exact models I use with Investment Banks, FP&A Teams, SaaS Companies, and Private Equity Firms 👉 Click here to learn more.