Pls Fix Thx
There's nothing quite like staring at an unbalanced Financial Model, wondering what isn't working, as the clock starts to get later and later.
I've been there. Many times.
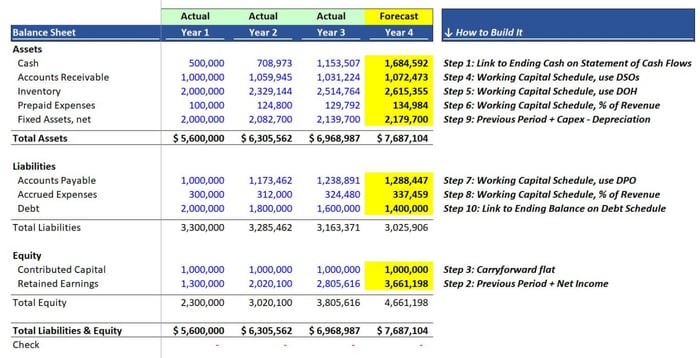
After many frustrating nights, I've figured out a 10 Step Checklist to get your Balance Sheet to balance, every time.
Let's dive in...
The Steps, 1 through 10
Let's Start by Balancing First
Complete these first two steps and your Balance Sheet will balance. From there it gets easier.
1. Cash = direct link to “ending cash” on your Statement of Cash Flows.
For historical periods, you will likely pull the ending cash balance from the accounting system (as a hardcoded actual).
For forecast periods, the ending cash on your balance sheet becomes a formula, and links directly to the ending cash on your Statement of Cash Flows.
2. Retained Earnings = the prior period + Net Income.
Once you complete Steps 1 and 2, your Balance Sheet will balance.
Now the Other Schedules
3. Contributed Capital = most likely just carry it forward flat.
If you're expecting to raise equity capital, then you could build a separate schedule that has an equity investment amount trigger as of a certain date.
You'd link that ending balance to your balance sheet.
Net Working Capital or “NWC” (will be it’s own schedule)
4. Accounts Receivable: built using DSO
For AR, the classic way of forecasting is to use Days Sales Outstanding or DSO.
The DSO = (Average AR balance / Total Revenue) x Time in Days
Once you have your DSO (based on the history), you carry it forward as an assumption.
Then you model your AR like this:
(Total Revenue / Time in Days) x DSO Assumption
Basically, you're just flipping the formula around.
An alternate approach here is to use a "corkscrew layout," which looks like this:
Beginning Balance (+) Revenue (-) Cash Receipts Ending Balance
The ending balance of this schedule goes to the Balance Sheet.
5. Inventory: built using DOH
Inventory is the same idea as AR, but you're referencing the Inventory balance and the COGS balance (instead of AR and Revenue).
The "corkscrew" would look like this:
Beginning Balance (+) Purchases (-) COGS Ending Balance.
6. Prepaid Expenses: built using % of Sales
Simply take the ending balance in any given period as percent of sales, and then carry this percent forward as an assumption, and calculate the implied balance.
7. Accounts Payable: built using DPO
AP is the same as AR and Inventory, but you're referencing the AP balance and the COGS balance.
The "corkscrew" would look like this:
Beginning Balance (+) Purchases (-) Vendor Payments Ending Balance
8. Accrued Expenses: built using % of Sales
Exact same process as Prepaid Expenses
Other Schedules
9. Fixed Assets = the prior period + Capex - Depreciation
You would have a separate "capex budget," the spend of which increases your Fixed Asset account.
Each of these capital spend projects gets layered into a Depreciation schedule, which decreases your Fixed Asset account.
It looks like this (the "corkscrew"):
Beginning Balance (+) Capex (-) Depreciation Ending Balance
The ending balance of this schedule goes to the Balance Sheet.
10. Debt = link to the ending balance on your Debt Schedule
Debt schedules can become incredibly complex but here's the big picture:
Beginning Balance (+) Any draws / PIK interest (-) Standard Principal Payments (-) Discretionary prepayments Ending Balance
The Interest Expense would be calculated based on the average debt balance (advanced and uses circularity) or more simply on just the beginning balance (no circularity required).
The Schedules You Need
Now, to get to these 10 “link-up” steps, you need 5 Schedules.
They are:
- The Income Statement
- The Statement of Cash Flows
- The Working Capital Schedule (again, one of my favorites because it gives us 5 line items)
- The Capex & Depreciation Schedule
- The Debt Schedule
Vertical Integration
My preference is to build these schedules on the same tab (aka “vertical modeling”) so that you’re linking all within one space.
Others prefer separate tabs (aka “horizontal modeling”) — you do you. It’s all good.
This is one of those things that’s hard to learn, but once you know it, it speeds up your modeling tremendously.
That's it for today. See you next time.
—Chris

